
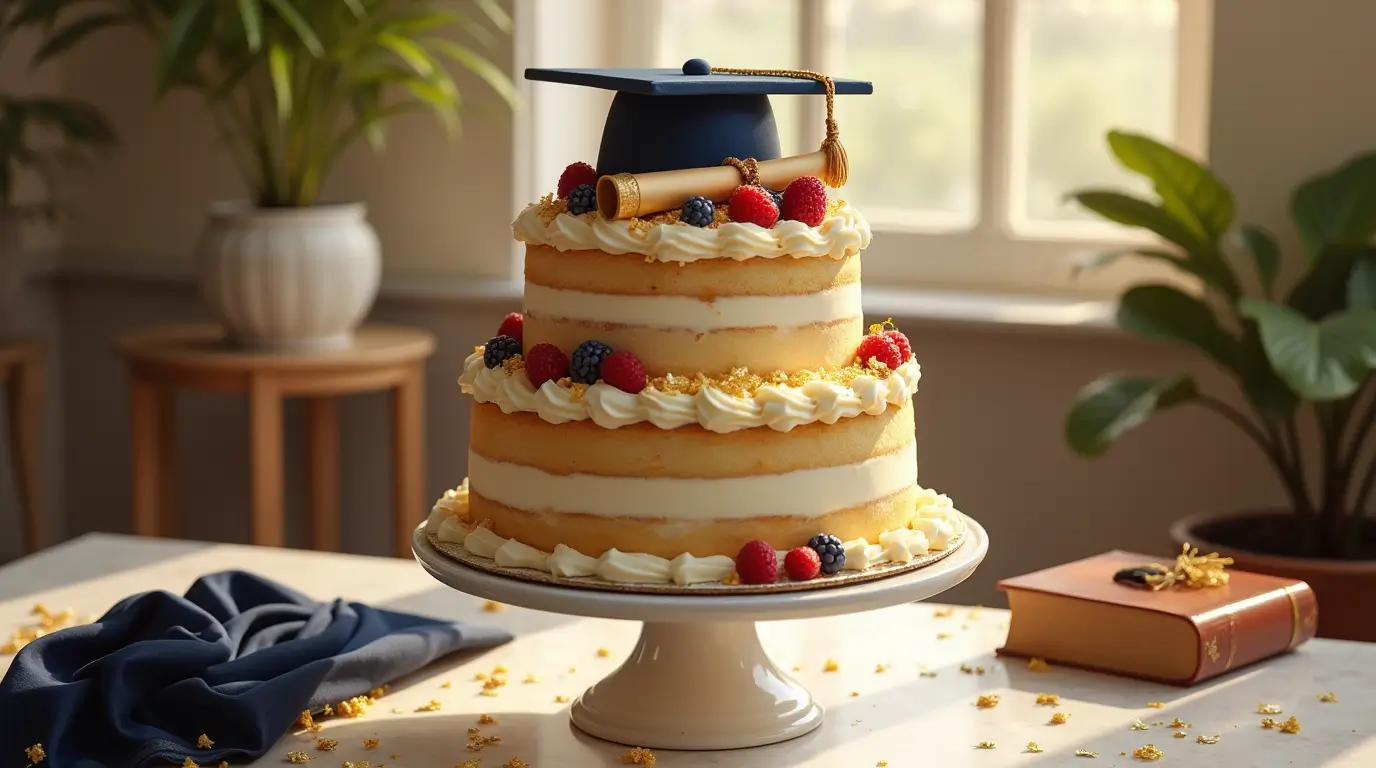
What’s sweeter than celebrating years of hard work? A graduation cake that’s as unforgettable as the milestone itself! Whether you’re honoring a high school grad or a college superstar, this recipe is your ticket to a showstopping centerpiece—think moist vanilla layers hugged by creamy frosting, all customizable to match your grad’s personality (or school colors!).
As someone who’s baked countless custom graduation cakes, I’ve crafted this recipe to balance simplicity and wow factor. No fancy tools? No problem! From DIY celebration cakes with hand-piped designs to allergy-friendly options that everyone can enjoy, we’ve got you covered.
Why settle for basic when you can infuse citrus zest for a zingy twist or layer in salted caramel for rich indulgence? Let’s turn this culinary achievement into a delicious symbol of pride—one slice at a time. 🎓✨
Table of Contents
Key Benefits: Why This Graduation Cake Shines
Graduation day is all about celebrating big wins—and this cake is designed to match that energy! Whether you’re a baking newbie or a seasoned pro, here’s why this recipe deserves a spot at your grad’s party:
✨ Customizable for Every Taste
Swap vanilla for almond extract, add lemon zest for brightness, or layer in chocolate ganache for decadence. This moist vanilla cake base is a blank canvas for your grad’s favorite flavors.
✨ Budget-Friendly & Time-Smart
Skip the bakery markup! With simple DIY celebration cake techniques (like using store-bought fondant or premade sprinkles), you’ll craft a stunning centerpiece for half the cost—and most of the work can be done ahead.
✨ Allergy-Friendly Adaptations
Gluten-free? Dairy-sensitive? No problem! Substitute with 1:1 gluten-free flour or plant-based butter, and you’ll still get that perfectly tender crumb everyone raves about.
✨ Nostalgia Meets Modern Flair
Top it with a classic graduation cap topper or go bold with edible glitter and school-color stripes. Either way, it’s a memorable keepsake that tastes as good as it looks.
Pro Tip: Bake layers up to 2 days in advance and freeze them—frosting day will feel like a breeze!
Ingredients: Gather Your Grad-Worthy Tools

Let’s raid your pantry and fridge! These ingredients strike the perfect balance between classic and customizable, ensuring your graduation cake tastes as triumphant as it looks.
Cake Base
- 2 ½ cups (300g) all-purpose flour – Spoon and level to avoid dense layers!
- 1 ½ cups (300g) granulated sugar – For that just-sweet-enough crumb.
- 1 cup (240ml) buttermilk – The secret to ultra-moist vanilla cake (sub with 1 cup milk + 1 tbsp vinegar for DIY buttermilk).
- ¾ cup (170g) unsalted butter, softened – Use plant-based butter for dairy-free.
- 3 large eggs, room temp – Ensures smooth batter.
- 1 tbsp vanilla bean paste – Richer than extract! (Or 2 tsp almond extract for nutty depth.)
- 2 tsp baking powder – Lifts layers to sky-high fluffiness.
- ½ tsp salt – Balances sweetness.
Creamy Frosting
- 3 cups (360g) powdered sugar – Sift to avoid lumps.
- 1 cup (225g) unsalted butter, softened – Vegan butter works too.
- 1 tsp vanilla extract – Keep it classic, or add citrus zest for zing!
- 2-3 tbsp heavy cream – Adjust for spreadable consistency (dairy-free? Use coconut cream).
Decorations (Pick Your Faves!)
- Fondant – Roll into diplomas or grad caps.
- Edible glitter or gold leaf – For Insta-worthy shimmer.
- Gel food coloring – Match school colors (pro tip: gel > liquid for vibrant hues).
- Sprinkles or chocolate shards – Quick texture and crunch.
Allergy-Friendly Swaps
- Gluten-free? Use 1:1 GF flour (Bob’s Red Mill works great).
- Egg-free? Substitute each egg with ¼ cup unsweetened applesauce.
- Nut-free? Skip almond extract; stick to vanilla.
Pro Tip: Measure before mixing—lay out all ingredients like a baking mise en place. It’s a game-changer for stress-free prep!
Instructions: Bake, Layer, and Celebrate!
Let’s transform those ingredients into a showstopping graduation cake! Follow these steps for flawless layers and swoon-worthy frosting—no stress, just delicious results.
Step 1: Prep Like a Pro
- Preheat oven to 350°F (175°C) – Rack in the middle position.
- Grease two 8-inch round pans – Line bottoms with parchment paper for easy release.
- Bring ingredients to room temp – Eggs, butter, and buttermilk blend smoother when not cold!
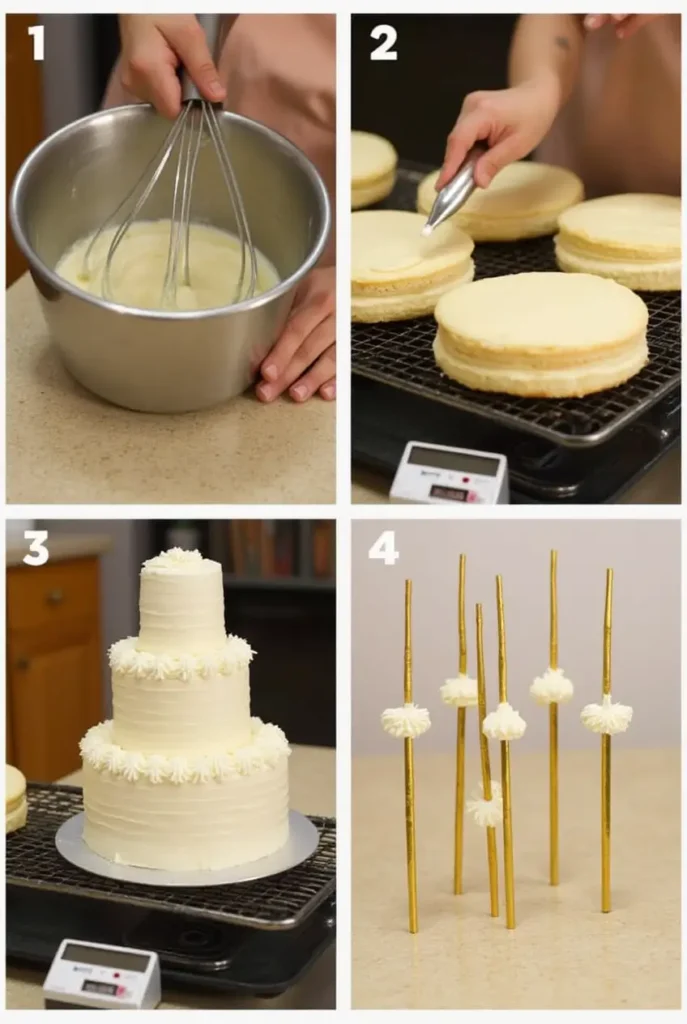
Step 2: Mix the Cake Batter
- Cream butter & sugar – In a large bowl, beat softened butter and sugar for 3–4 minutes until fluffy and pale.
- Add eggs & vanilla – Mix in eggs one at a time, then vanilla bean paste. Scrape the bowl sides!
- Combine dry ingredients – Whisk flour, baking powder, and salt in a separate bowl.
- Alternate wet & dry – Add ⅓ of the flour mix, then ½ the buttermilk. Repeat, ending with flour. Mix until just combined—overmixing = tough cake!
Step 3: Bake to Golden Perfection
- Divide batter evenly – Use a kitchen scale for precision (about 450g per pan).
- Bake 25–30 minutes – Rotate pans halfway for even browning.
- Test doneness – A toothpick should come out clean, and edges pull away from the pan.
Step 4: Cool & Level Layers
- Cool pans on a rack – 10 minutes, then invert cakes onto the rack to cool completely.
- Trim domed tops – Use a serrated knife for flat layers (snack on the scraps—chef’s perk!).
Step 5: Frosting Magic
- Make the buttercream – Beat butter for 2 minutes, then gradually add powdered sugar. Mix in vanilla and cream until smooth and spreadable.
- Crumb coat first – Spread a thin layer of frosting over the cake to trap crumbs. Chill 15 minutes.
- Final frosting layer – Pile on the remaining buttercream, smoothing with a bench scraper or spatula.
Step 6: Decorate with Pride
- Pipe borders – Use a star tip for swirls along the edges.
- Add fondant accents – Roll out store-bought fondant into mini diplomas or grad caps.
- Sprinkle school colors – Press sprinkles onto the sides for a confetti effect!
Pro Tip: If frosting softens, pop the cake in the fridge for 10 minutes between steps.
Pro Tips and Variations: Make It Uniquely Yours
Now that your masterpiece is baked, let’s add personal flair! These hacks and twists ensure your graduation cake reflects your grad’s personality—no two cakes alike.
Pro Tips for Stress-Free Success
🔹 Shortcut Alert: Swap the cake base with a quality boxed mix if time’s tight—just add 1 tsp vanilla extract and ½ cup sour cream for bakery-level richness.
🔹 Smoother Frosting: Dip your spatula in hot water, dry it, and glide over buttercream for a mirror-like finish.
🔹 Fondant Hack: Knead a pea-sized dab of vegetable shortening into fondant to keep it soft and pliable.
🔹 Freeze for Later: Wrap unfrosted layers in plastic and freeze up to 1 month—thaw at room temp before decorating.
Flavor Variations
🍋 Zesty Lemon: Add 2 tbsp lemon zest + 1 tsp lemon extract to the batter, and fill layers with lemon curd.
🍫 Chocolate Lover’s Dream: Replace ½ cup flour with cocoa powder, and layer with chocolate ganache.
☕ Espresso Twist: Mix 1 tbsp instant espresso into the batter for a grown-up mocha vibe.
Decoration Ideas
🎓 Classic Grad Theme: Pipe buttercream tassels in school colors, or top with a fondant diploma.
✨ Edible Glam: Brush layers with edible gold dust or press metallic sprinkles along the sides.
📸 Photo-Worthy: Print an edible image of the grad’s face or school logo for a surprise topper!
Allergy-Friendly Tweaks
🌱 Vegan Version: Use flax eggs (1 tbsp ground flax + 2.5 tbsp water per egg) and vegan butter.
🌾 Gluten-Free: Substitute flour with a 1:1 GF blend and ensure baking powder is GF-certified.
🥜 Nut-Free: Skip almond extract; use vanilla or coconut extract instead.
Serving Suggestions: Wow Guests from Slice to Bite
Your graduation cake isn’t just dessert—it’s the edible star of the party! Here’s how to showcase it with flair and keep every guest raving.
Presentation Perfection
🎂 Elevate It: Place the cake on a pedestal stand (or a cake plate wrapped in metallic foil for DIY glam).
🎨 Theme It Up: Scatter graduation caps, mini diplomas, or fresh flowers (non-toxic!) around the base to match decorations.
✨ Lighting Hack: Drape fairy lights under the stand for a soft glow in photos.
Slice Like a Pro
🔸 Portion Guide:
- 8-inch cake: Serves 12–15 (generous slices) or 20–25 (smaller servings with other desserts).
- Clean Cuts: Dip a sharp knife in hot water, wipe dry, and slice—repeat between cuts for neat edges.
Pairing Ideas
🥂 Toast to the Grad: Serve with:
- Sparkling lemonade + raspberries (non-alcoholic).
- Cold brew coffee (to balance the cake’s sweetness).
Dessert Table Duos
🍪 Sidekicks: Offer:
- Graduation cap sugar cookies (use fondant toppers).
- Mini cupcakes (from leftover batter!).
- A “Memory Jar” with handwritten notes from guests to the grad.
Leftover Love
🍰 Save for Later:
- Freeze slices in airtight containers (up to 1 month).
- Crumble cake into trifles with whipped cream and berries.
- Toast day-old cake cubes and serve with ice cream!
Pro Tip: Snap a photo of the cake with the grad before slicing—it’ll be a cherished keepsake!
Conclusion: Celebrate Sweet Success
Your graduation cake isn’t just a dessert—it’s a delicious tribute to late-night study sessions, hard-earned achievements, and the bright future ahead. Whether you’ve crafted a classic vanilla masterpiece or a bold flavor fusion, this cake is a reminder that the best celebrations are shared with love (and buttercream!).
Why This Cake Wins
🌟 Pride on a Plate: Every slice tells a story of perseverance.
🌟 Flexibility First: From gluten-free tweaks to last-minute shortcuts, this recipe adapts to your needs.
🌟 Edible Memories: Years from now, your grad will remember the care baked into this sweet centerpiece.
Final Tips for a Stress-Free Celebration
- Plan Ahead: Bake layers 1–2 days early and freeze them—frosting day becomes a joy, not a chore.
- Get the Grad Involved: Let them pipe a message or add their favorite candy as a topping.
- Savor the Moment: Snap a photo of the first slice—it’s a milestone worth framing!
Pass It On
Share this recipe with fellow grads, proud parents, or anyone craving a memorable celebration dessert. Tag your creations with #GradCakeVictory—we’d love to cheer on your baking triumph!
FAQs: Your Graduation Cake Questions, Answered
Got last-minute jitters? Let’s tackle common queries so your graduation cake turns out stress-free and stunning!
How far in advance can I bake the cake layers?
Bake layers up to 2 days ahead! Wrap cooled cakes tightly in plastic and store at room temp. For longer storage, freeze for up to 1 month—thaw overnight in the fridge before frosting.
Can I make this cake gluten-free or vegan?
Absolutely!
Gluten-free: Use a 1:1 GF flour blend (like King Arthur’s).
Vegan: Swap eggs with flax eggs (1 tbsp flax + 2.5 tbsp water per egg) and use plant-based butter/cream.
My frosting is too runny. Help!
No panic fixes:
Chill the bowl and beaters for 10 minutes, then re-whip.
Add ¼ cup powdered sugar at a time until thickened.
For dairy-free frosting, use coconut oil instead of butter for a firmer texture.
How do I prevent fondant decorations from cracking?
Keep fondant soft with these hacks:
Knead in a dab of vegetable shortening before shaping.
Store unused fondant in an airtight bag with a damp paper towel.
Roll it out on powdered sugar (not flour) to avoid dryness.
What’s the best way to transport this cake?
Avoid sliding with these tips:
Chill the cake for 1 hour before travel to firm up frosting.
Place on a non-slip mat (or DIY with damp paper towels under the cake board).
Use a box slightly larger than the cake—poke chopsticks through the box lid to prevent touching the top.
Can I use liquid food coloring for the frosting?
Stick with gel food coloring! Liquid can thin your buttercream. Gel offers vibrant hues without altering consistency—start with a toothpick dip and add gradually.