

Ever wondered why your beef chuck roll sometimes turns out dry or chewy? You’re not alone! This collagen-rich, budget-friendly cut is a hidden gem for hearty meals, but it demands a little know-how to unlock its full potential. Picture this: marbled beef, slowly braised to fork-tender perfection in a Dutch oven, infused with aromatics and a splash . Sounds dreamy, right?
Yet, one misstep—like skipping the sear or rushing the cook time—can leave you with lackluster results. That’s where our expert tips come in! Whether you’re dry-brining for deeper flavor or exploring sous-vide alternatives, we’ll guide you past common pitfalls and toward melt-in-your-mouth success.
From Sunday suppers to meal-prep magic, this versatile cut is your ticket to crowd-pleasing dinners. Ready to transform humble chuck roll into a savory masterpiece? Let’s dive in—no regrets, just flavor. 🥩✨
Table of Contents
Key Benefits: Why Beef Chuck Roll Deserves a Spot in Your Kitchen
Let’s be honest: not all beef cuts are created equal. But the humble chuck roll? It’s the underdog hero of budget-friendly, flavor-packed meals. Think of it as your secret weapon for turning simple ingredients into something extraordinary. Here’s why this cut deserves your attention (and your Dutch oven):
✅ Marbling Magic: Those thin streaks of fat running through the meat? That’s marbling—your ticket to rich, juicy flavor. Unlike leaner cuts, chuck roll’s fat melts during cooking, basting the meat from within.
✅ Collagen Powerhouse: Packed with collagen, this cut transforms into fork-tender perfection when cooked low-and-slow. Collagen breaks down into silky gelatin, giving you that “melt-in-your-mouth” texture without fancy techniques.
✅ Budget-Friendly Brilliance: Why splurge on pricier cuts like ribeye or short ribs? Chuck roll delivers comparable depth for a fraction of the cost—ideal for feeding a crowd or meal-prepping hearty lunches.
✅ Versatility Wins: Braise it, slow-cook it, or even sous-vide it. This cut thrives in a Dutch oven (hello, even heat distribution!) and pairs effortlessly with bold spices, or earthy root veggies.
Pro Insight: Look for chuck rolls with even marbling and a bright red hue. Avoid pieces with large, hard fat deposits—they won’t render down as well.
Whether you’re craving a cozy Sunday roast or prepping freezer meals, this cut is your ally. Now, let’s gather your ingredients and turn this kitchen hero into a masterpiece. 🧑🍳🔥
Ingredients: Your Flavor-Packed Toolkit
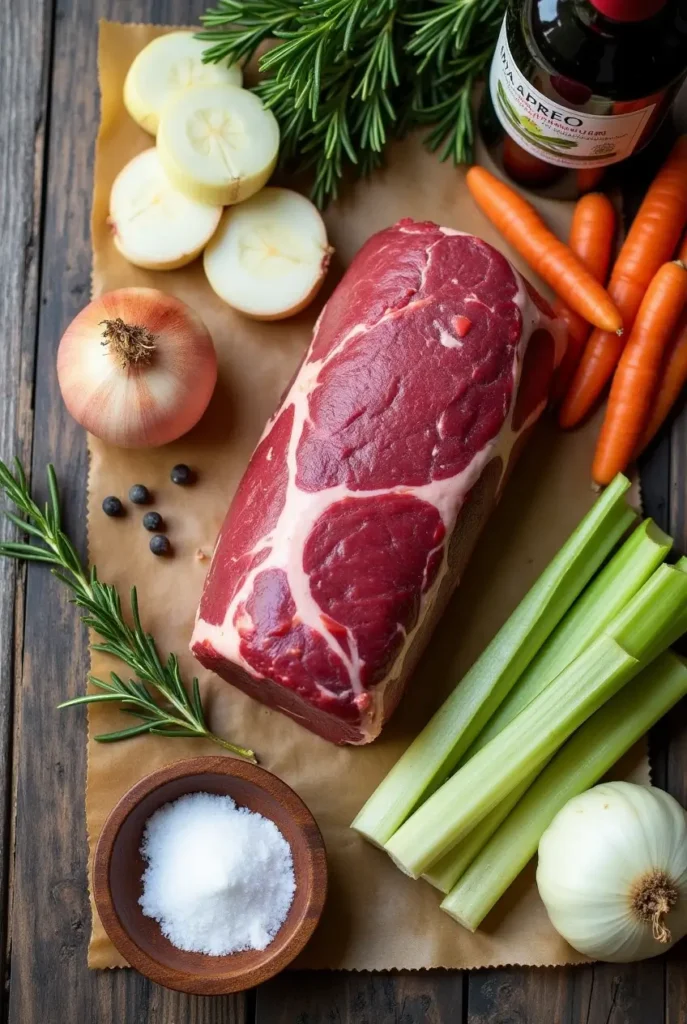
Let’s keep things simple but strategic! These ingredients are chosen to maximize flavor, avoid common mistakes, and turn your beef chuck roll into a succulent star. Pro tip: Measure everything before you start—trust me, it’s a game-changer for stress-free cooking.
✅ The Essentials
- Beef chuck roll (3–4 lbs): Look for even marbling and a bright red hue.
- Kosher salt (1 tbsp): Its coarse texture ensures better seasoning penetration.
- Black pepper (1 tsp): Freshly cracked adds a subtle, aromatic heat.
- Olive oil (2 tbsp): For searing—the flavor foundation!
- Aromatics:
- 1 large onion, roughly chopped
- 4 garlic cloves, smashed
- 2 carrots, chopped into chunks (no need to peel!)
- 2 celery stalks, sliced—leaves included for extra herbiness.
✅ Flavor Boosters
- Beef broth (2 cups): Low-sodium to control salt levels.
- Tomato paste (2 tbsp): For umami richness—brown it slightly for a caramelized kick.
- Bay leaves (2): Subtle earthiness that ties everything together.
✅ Optional (But Worth It)
- Fresh thyme or rosemary: 3–4 sprigs for a fragrant lift.
- Cornstarch (1 tbsp): Mix with water for a glossy, quick-thickened gravy.
Instructions: Master the Art of Fork-Tender Beef Chuck Roll
Let’s turn that marbled beauty into a showstopper! Follow these steps closely to avoid common pitfalls and nail that melt-in-your-mouth texture. I’ve broken it down into stress-free phases—no chef skills required.
🔥 Phase 1: Prep Like a Pro
- Dry the Beef: Pat the chuck roll thoroughly with paper towels. Moisture is the enemy of a good sear!
- Season Generously: Rub kosher salt and pepper all over the meat—don’t skip the sides. Let it sit at room temperature for 30 minutes (trust me, it’s worth the wait).
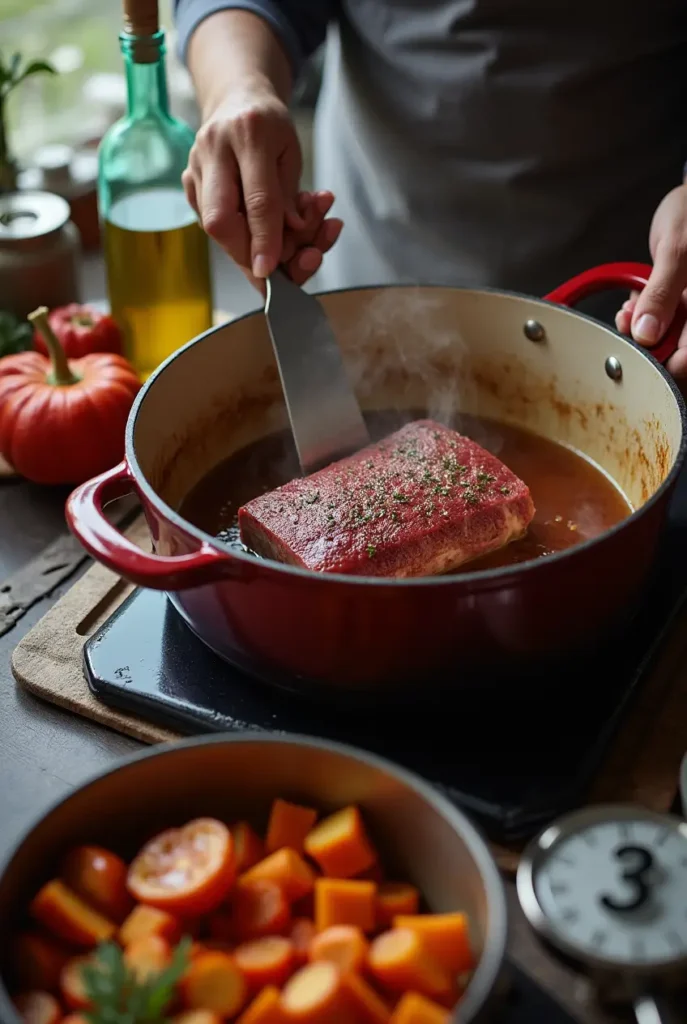
🥘 Phase 2: Sear for Success
3. Heat the Dutch Oven: Add olive oil over medium-high heat until it shimmers.
4. Sear Strategically: Place the chuck roll in the pot and don’t touch it for 4–5 minutes per side. You want a deep brown crust—this is flavor gold!
- Pro Tip: Use tongs to sear the edges for 1–2 minutes each.
🍷 Phase 3: Build the Braise
5. Sauté Aromatics: Reduce heat to medium. Add onions, garlic, carrots, and celery. Cook until softened (5 mins).
7. Layer Flavors: Stir in tomato paste, beef broth, and bay leaves. Nestle the seared beef back into the pot—liquid should come halfway up the meat.
⏲️ Phase 4: Low-and-Slow Magic
8. Braise, Don’t Rush: Cover the Dutch oven and transfer to a preheated 300°F (150°C) oven. Cook for 3–3.5 hours.
- Checkpoint: Meat should pull apart easily with a fork. If not, give it another 30 minutes.
💤 Phase 5: Rest & Shine
9. Let It Rest: Transfer the beef to a cutting board, tent with foil, and rest for 20 minutes. This keeps it juicy!
10. Finish the Sauce: Skim excess fat from the braising liquid. For thicker gravy, mix cornstarch with 2 tbsp cold water, stir into the pot, and simmer 5 minutes.
Pro Tip: No Dutch oven? Use a heavy pot with a tight-fitting lid or a slow cooker on low for 8–10 hours.
Pro Tips & Variations: Elevate Your Beef Chuck Roll Game
You’ve nailed the basics—now let’s level up! These insider tricks and creative twists will help you dodge rookie errors and tailor this dish to your taste buds.
🔧 Pro Tips for Flawless Results
- Dry Brine Overnight: For next-level flavor and tenderness, salt the beef chuck roll 12–24 hours ahead. Store it uncovered in the fridge—this draws out moisture, then lets the salt reabsorb deeply.
- Brown the Tomato Paste: After sautéing aromatics, cook the tomato paste for 2–3 minutes until it darkens slightly. This caramelizes its sugars, adding complex umami.
- Skim the Fat: Use a spoon to remove excess fat from the braising liquid before reducing it into gravy. Your sauce will be rich, not greasy.
- Rest, Then Slice: Let the meat rest 20 minutes before slicing against the grain. This keeps juices locked in and ensures tender bites.
🌶️ Flavor Variations to Wow Your Crowd
- Spice Rub Twist: Mix 1 tbsp smoked paprika + 1 tsp cumin + 1/2 tsp cinnamon for a warm, aromatic crust.
- Herb Swap: Swap bay leaves for 2 sprigs of fresh sage or tarragon for a brighter, earthy note.
- Gluten-Free Gravy: Thicken sauce with 1 tbsp arrowroot powder instead of cornstarch.
⚡ Fix Common Issues
- Tough Meat? Return it to the pot with 1 cup broth and braise another 30–45 minutes. Collagen needs time to break down!
- Bland Sauce? Stir in 1 tsp fish sauce or Worcestershire for a savory boost—no one will guess your secret.
- Short on Time? Chop the chuck roll into 2-inch cubes. Smaller pieces cook 1 hour faster!
🍴 Alternative Cooking Methods
- Sous-Vide: Season the beef, vacuum-seal with 2 tbsp butter and herbs, then cook at 165°F (74°C) for 24 hours. Finish with a quick sear.
- Slow Cooker: Sear the meat first, then cook on low 8–10 hours. Add veggies in the last 2 hours to avoid mush.
Serving Suggestions: Plate It Like a Pro
You’ve crafted a fork-tender masterpiece—now let’s make it shine! These pairing and presentation ideas will balance the beef’s richness and turn your meal into a crave-worthy experience.
🥔 Perfect Pairings
- Creamy Polenta: Silky, buttery polenta soaks up the braising liquid like a dream. Add Parmesan for extra decadence.
- Roasted Root Vegetables: Carrots, parsnips, or sweet potatoes roasted with rosemary add earthy sweetness.
- Crusty Bread: For sauce-swiping emergencies. Grill slices with garlic butter for a crispy upgrade.
- Bright Salads: A zesty arugula salad with lemon vinaigrette cuts through the richness.
🌟 Presentation Hacks
- Slice Against the Grain: Angle your knife across the muscle fibers for tender, Instagram-worthy slices.
- Garnish with Freshness: A sprinkle of chopped parsley or thyme leaves adds color and freshness.
- Sauce on the Side: Serve gravy in a small pitcher for DIY drizzling.
♻️ Leftover Magic
- Beef Tacos: Shred leftovers, toss with cumin and chili powder, and pile into warm tortillas.
- Philly-Style Sandwich: Sauté onions and peppers, layer on a roll with provolone, and broil until bubbly.
- Beef Fried Rice: Chop into bits and stir-fry with day-old rice, veggies, and soy sauce.
Pro Tip: Hosting a crowd? Serve the chuck roll family-style on a large platter with veggies and bread around it—effortless and inviting!
Conclusion: Your Ticket to Beef Chuck Roll Mastery
Let’s face it: Cooking beef chuck roll isn’t just about following steps—it’s about embracing the art of patience and flavor-building. With these expert tips, you’ve learned to sidestep costly mistakes (like rushed cooking or skipped searing) and transform an affordable cut into a restaurant-worthy dish. Whether you’re meal-prepping for the week or hosting a cozy dinner, this collagen-rich marvel proves that budget-friendly doesn’t mean bland or boring.
Take pride in those fork-tender results, and remember: The Dutch oven is your ally, low-and-slow is your mantra, and leftovers are your secret weapon. Got questions? Our FAQs below have your back. Now, grab that chuck roll, channel your inner chef, and savor the rewards of a meal that’s equal parts hearty, humble, and utterly unforgettable.
FAQs: Your Beef Chuck Roll Questions, Answered
Got a burning question? We’ve got answers! Here’s how to troubleshoot, adapt, and own this recipe like a pro.
Why is my chuck roll still tough after 3 hours?
Collagen Needs Time: Chuck roll is dense! If it’s not fork-tender, extend braising time by 30–45 minutes. Check liquid levels—add broth if needed.
Cut Size Matters: Larger pieces (over 4 lbs) may need up to 4.5 hours. Patience pays off!
How do I store leftovers?
Fridge: Store meat and gravy in an airtight container for up to 4 days.
Freezer: Portion into freezer bags (squeeze out air!) for 3 months. Thaw overnight in the fridge.
Reheat Smart: Warm in a covered skillet with a splash of broth to prevent dryness.
Can I use a slow cooker instead of a Dutch oven?
Yes! Follow these tweaks:
Sear the meat first (non-negotiable for flavor!).
Cook on low 8–10 hours. Add veggies in the last 2 hours to avoid mush.
Is chuck roll the same as chuck roast?
Close cousins! Chuck roll is a specific sub-primal cut, while chuck roast is often a cross-section. Both work here, but cooking times may vary slightly.
How do I fix bland gravy?
Quick Fixes:
Stir in 1 tsp soy sauce or fish sauce (secret umami bombs!).
Add a pinch of smoked paprika or a dash of Worcestershire.
Simmer with a Parmesan rind for 10 minutes (remove before serving).