

Craving a crunchy, protein-packed snack that’s as versatile as it is irresistible? Say hello to homemade beef pepperoni—your new go-to gluten-free, keto-friendly hack for satisfying those savory cravings! Whether you’re prepping snacks for game day, jazzing up a charcuterie board, or sneaking a crispy bite straight from the oven, this recipe delivers bold flavor and a crave-worthy crunch in every slice.
Why settle for store-bought when you can customize the spice level, guarantee no artificial additives, and enjoy that golden, crispy edge only homemade can offer? (Trust me, your pizza—and your taste buds—will thank you.) Let’s turn your kitchen into a pepperoni powerhouse with simple ingredients, clever tricks, and endless ways to snack smarter. Ready to hack your cravings? Let’s slice into it! 🍕✨
Table of Contents
Key Benefits: Why Homemade Beef Pepperoni is a Snack Game-Changer
Ever wonder why homemade beef pepperoni deserves a permanent spot in your snack rotation? Let’s break down the perks that make this crispy, savory treat a kitchen MVP:
✅ Protein-Packed Crunch
Skip the empty calories! Each slice delivers a lean protein boost (thanks to quality ground beef) that keeps hunger at bay and energy levels steady—perfect for post-workout munching or midday slumps.
✅ Gluten-Free & Keto-Friendly
No sneaky additives or fillers here. This recipe sticks to simple spices and natural curing, making it ideal for gluten-free, keto, or low-carb lifestyles. (Yes, crunchy snacks CAN fit your diet!)
✅ Quick Snack, Big Flavor
From fridge to plate in under an hour! Whip up a batch for game-day spreads, lunchbox surprises, or midnight cravings. Pro tip: Double the recipe—it stays crispy for days!
✅ Meal Prep Hero
Slice it for salads, crumble it over pizza, or pair it with cheese for a 10-second charcuterie board. It’s the multitasker your fridge (and your Instagram) needs.
✅ No Nasties, Just Flavor
Control the salt, adjust the heat, and nix the preservatives. Your kitchen, your rules—bold, smoky, and 100% real ingredients.
Hungry yet? Let’s grab those spices and transform that ground beef into your new snack obsession. 🥩✨
Ingredients: Your Simple Checklist for Flavor-Packed Beef Pepperoni
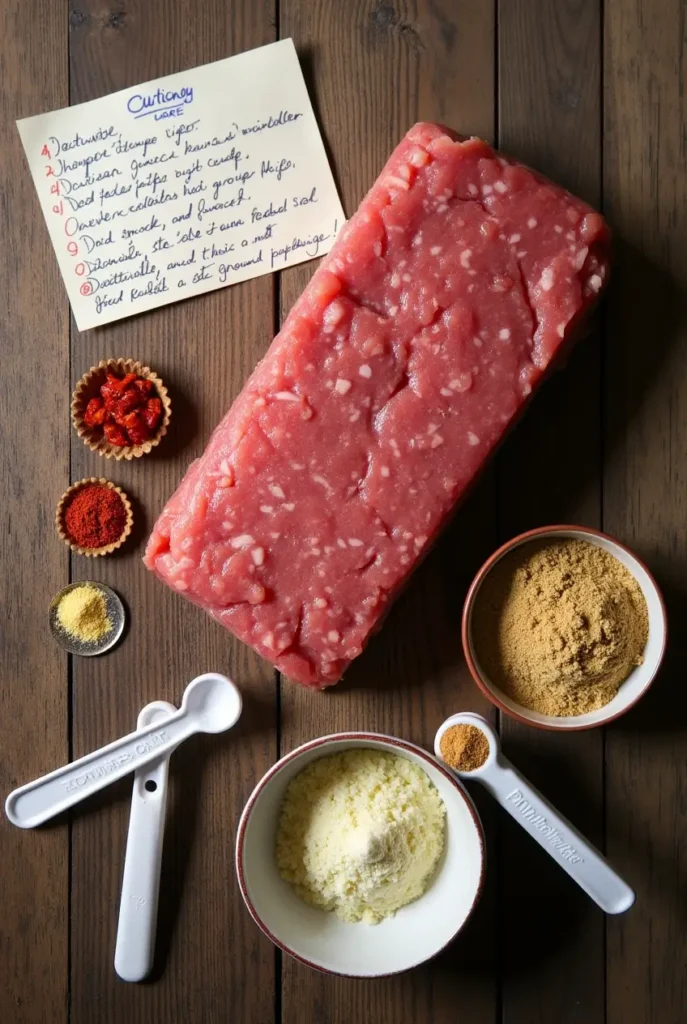
Ready to raid your pantry? Here’s everything you’ll need to craft crispy, crave-worthy beef pepperoni—no fancy gadgets or hard-to-find items required!
📝 The Essentials
- 1 lb lean ground beef (85/15 blend) – The star! Lean beef ensures crispy edges without excess grease.
- 1 tbsp smoked paprika – For that signature smoky depth.
- 1 tsp garlic powder – Because everything’s better with garlic.
- 1 tsp crushed red pepper flakes – Adjust to tame (or turbocharge) the heat!
- 1 tsp curing salt (Prague Powder #1) – Optional but recommended for that classic pepperoni tang and food-safe preservation.
🌿 Flavor Boosters (Pick Your Faves!)
- 1/2 tsp fennel seeds – Adds a subtle licorice-like punch.
- 1 tsp honey or maple syrup – Balances heat with a hint of sweetness.
- 1/2 tsp liquid smoke – For an extra campfire-kissed vibe.
🔁 Dietary Swaps
- Ground turkey or plant-based meat – Easily swap for a lighter or vegan twist.
- Coconut aminos – A gluten-free alternative to soy sauce for umami depth.
Pro Tip: No curing salt? Use 1.5 tsp kosher salt instead, but note the texture will be softer. For shelf-stable pepperoni, stick with Prague Powder!
Instructions: Crispy Homemade Beef Pepperoni in 3 Easy Steps
Let’s turn that spiced beef into crispy, golden perfection! Follow these foolproof steps—whether you’re using an oven, air fryer, or dehydrator.
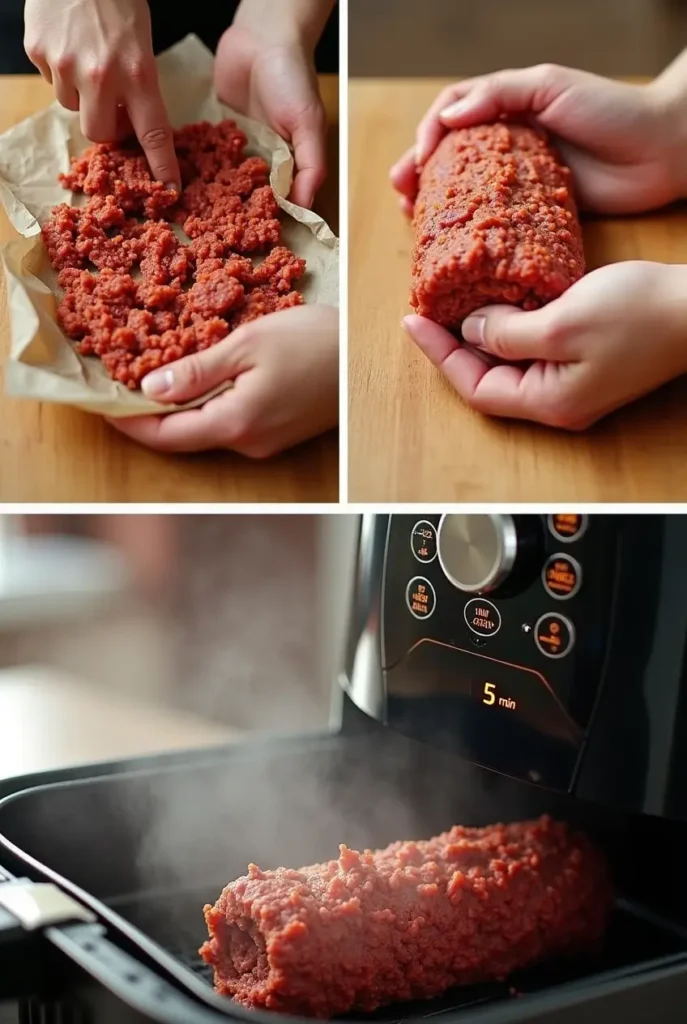
Step 1: Prep & Season
- Mix the magic: In a bowl, combine ground beef, smoked paprika, garlic powder, red pepper flakes, and curing salt (if using). For extra flavor, add your chosen boosters (fennel, honey, etc.).
- Knead lightly: Use gloves to gently mix until spices are evenly distributed—overworking = tough pepperoni!
- Shape the log: Roll the mixture into a 2-inch-thick log on parchment paper. Pro tip: Wrap tightly and chill for 30 minutes to firm up (easier slicing later!).
Step 2: Cook to Crispy Perfection
🔥 Oven Method
- Preheat to 325°F (165°C). Place the log on a parchment-lined baking sheet.
- Bake for 25-30 minutes, flipping halfway, until edges are caramelized and internal temp hits 160°F.
🍟 Air Fryer Hack
- Cook at 300°F (150°C) for 15-18 minutes, shaking the basket gently midway. No overcrowding—crispiness demands space!
🌬️ Dehydrator Option
- Slice raw log into ¼-inch rounds. Dehydrate at 160°F (71°C) for 4-6 hours until dry but slightly flexible.
Step 3: Slice & Store
🔪 Slicing Pro Tip: Use a sharp knife for thin, even rounds. For extra crunch, pop cooled pepperoni back in the oven/air fryer at 200°F for 10 minutes.
🗃️ Storage Smarts:
- Keep in an airtight container for up to 1 week (fridge) or 3 months (freezer).
- Using curing salt? It’ll stay shelf-stable for 2 weeks in a cool, dark pantry!
Ready to crunch? Toss these slices on pizza, salads, or straight into your snack bowl—you’ve just hacked homemade pepperoni! 🥓✨
Pro Tips and Variations: Elevate Your Beef Pepperoni Game
Transform your homemade pepperoni from “good” to “can’t-stop-eating-this” with these chef-approved hacks and creative twists!
🔥 Flavor Boosters
- Spice It Up: Double the red pepper flakes or add a dash of cayenne for fiery pepperoni that packs a punch.
- Smoke Signal: No liquid smoke? Toss a handful of wood chips in your oven’s smoker box (or wrap in foil with holes) during baking.
- Sweet Heat: Brush slices with honey or maple syrup before baking for a caramelized, sweet-spicy kick.
🥓 Texture Hacks
- Crispy Edges Guaranteed: After baking, broil pepperoni on high for 1-2 minutes—watch closely to avoid burning!
- Chewy vs. Crunchy: For tender bites, slice thicker (½-inch). For chips, go paper-thin and dehydrate longer.
🌱 Dietary Variations
- Vegetarian Swap: Use plant-based ground “meat” and add 1 tbsp soy sauce or coconut aminos for umami depth.
- Kid-Friendly Mild: Skip the red pepper flakes and add 1 tsp sweet paprika + ½ tsp onion powder.
🛠 Troubleshooting Tips
- Avoid Dryness: If your pepperoni feels tough, you overmixed the meat! Next time, handle it like delicate cookie dough.
- Grease Patrol: Blot slices with a paper towel after cooking to keep them crisp, not greasy.
- Shelf Life Boost: Vacuum-seal batches with a silica gel packet for pantry storage up to 1 month.
Pro Move: Turn leftover pepperoni into “meat confetti”—pulse in a food processor and sprinkle over popcorn, eggs, or avocado toast!
Serving Suggestions: 10 Delicious Ways to Devour Your Beef Pepperoni
Your homemade pepperoni isn’t just a snack—it’s a flavor powerhouse waiting to jazz up meals, parties, and midnight munchies. Here’s how to put those crispy slices to work:
🧀 Charcuterie Board Star
Arrange pepperoni with sharp cheddar, olives, honeycomb, and crusty bread. Pro tip: Roll slices into mini cones for a fancy (but easy!) presentation.
🍕 Pizza Night MVP
Skip the sad, greasy takeout slices! Top your homemade pizza with pepperoni and crumble extra into the cheese for double the meaty goodness.
🥗 Salad Game-Changer
Toss crispy slices into:
- Caesar salad for a salty crunch.
- Grain bowls (farro + roasted veggies + pepperoni = lunch heaven).
- Avocado toast – because bacon isn’t the only upgrade.
🎉 Party Appetizers in a Flash
- Pepperoni chips: Serve with ranch or marinara dip.
- Skewers: Thread with mozzarella balls, basil, and a drizzle of balsamic.
- Stuffed dates: Fill with goat cheese + a pepperoni slice. Bake at 350°F for 10 mins.
🍝 Pasta’s Best Friend
Crumble over carbonara, stir into spicy arrabbiata, or mix with roasted garlic and olive oil for a 10-minute “pepperoni butter” pasta toss.
Pro Tip: For extra crunch, reheat slices in a dry skillet for 1-2 minutes before serving. They’ll stay crispy even on humid days!
Conclusion: Why This Homemade Beef Pepperoni Deserves a Spot in Your Kitchen
Let’s be real: once you’ve tasted crispy, customizable beef pepperoni straight from your oven (or air fryer!), there’s no going back to store-bought. Here’s the scoop on why this recipe is a kitchen keeper:
🌟 Budget-Friendly Brilliance
Homemade beats store prices every time. For the cost of one premium pack, you can whip up triple the batch—and control every pinch of spice.
🌟 Flavor Freedom Forever
Too spicy? Not smoky enough? Tweak the recipe like a pro. Your snacks, your rules. (Picky eaters? Meet your new secret weapon.)
🌟 Snack Smarter, Not Harder
From protein-packed lunchbox additions to last-minute party heroes, this pepperoni is the multitasker your pantry’s been missing.
Pro Tip: Slice a double batch and freeze portions—future you will high-five present you when cravings strike at midnight.
So, ready to ditch the preservatives and own your snack game? Grab that ground beef, and let’s make crunch happen. (Tag us when you do—we’re obsessed with foodie wins!) 🏆
FAQs: Your Homemade Beef Pepperoni Questions, Answered!
Got pepperoni puzzles? I’ve got solutions! Here’s the quick-fire scoop on everything from spice tweaks to storage hacks.
❓ How long does homemade beef pepperoni last?
Fridge: Up to 1 week in an airtight container.
Freezer: 3 months! Slice first, then freeze flat in bags for grab-and-go crispy bites.
Using curing salt? It’s pantry-safe for 2 weeks in a cool, dark spot.
❓ Can I make it less spicy for kids?
Absolutely! Skip the red pepper flakes and add:
1 tsp sweet paprika
½ tsp onion powder
A pinch of brown sugar for subtle sweetness.
❓ Help! My pepperoni turned out too dry.
Fix it now: Brush slices with olive oil and broil for 1 minute to revive.
Next batch: Don’t overmix the meat, and avoid overcooking—160°F internal temp is the sweet spot!
❓ Can I use a different meat?
Turkey or chicken: Leaner but equally delicious—add 1 tbsp olive oil to keep it moist.
Plant-based: Opt for firm vegan “meat” and boost umami with 1 tbsp soy sauce or mushroom powder.
❓ How do I reheat it without losing crunch?
Air fryer: 300°F (150°C) for 2-3 minutes.
Oven: Spread slices on parchment; bake at 275°F (135°C) for 5 minutes.
Never microwave—it’s the crunch killer!
❓ Can I make this gluten-free or paleo?
Gluten-free: Already is! Just ensure your spices are certified GF.
Paleo: Skip curing salt and use 1.5 tsp sea salt + ½ tsp apple cider vinegar for tang.
Pro Tip: For party prep, slice logs into coins before freezing—they cook faster straight from frozen!